[Tutorial] How do I set up an invoice management workflow?
Corporate invoicing is often an excellent entry point for your digital transformation project, because this process has the advantage of delivering results quickly and convincing teams of the benefits of automation.
Experience shows that paper invoices have a bad habit of being passed from hand to hand, with deadlines to be met and validation circuits that can be complex. That's why, if you want to help your teams get to grips with what it means to 'digitalise' a company, invoicing procedures are a very good lever.
Business process management applications are excellent tools for computerising companies' paper-based procedures. All you have to do is draw a diagram of the procedure you want to automate and then set up the connections to your existing applications.
In this tutorial, you will create an initial standard invoicing process. Note that the process can be customised as you wish.
Step 1: Study the scope of the process
Technological tools are still tools. It is therefore essential to establish upstream the needs that the process will have to meet. Here, it's a good idea to apply iterative methods to build your project, and with Iterop, this is very easy thanks to the application's instant evolution features.
At Iterop, here's how we typically start projects with our customers:
- Scoping meeting with the teams
- Define the process to be dematerialised
- List the key milestones and deliverables to be met
- Define who will drive the process and oversee testing
- Producing a proof of concept
- Deliver rapid results to operational staff
- Support & training:
- A 5-day training course is available to ensure that you are fully autonomous when using the tool.
- You can also delegate the design and configuration to our experts for an even faster proof of concept.
- Process upgrades can be carried out completely independently.
Step 2: Go from paper to data (model a diagram in BPMN 2.0)
The BPMN 2.0 standard is the writing language used internationally by all BPM software. A bit like a translator, it allows humans to visually interpret a drawing while the computer can automate it in parallel.
There are two interfaces available in Iterop:
- The PLAY section, which gives you access to the processes and the monitoring of stages,
- the DESIGN section, where you create and configure all your workflows in BPMN before making them available in Play.
You start with a blank sheet of paper, which means that you can design a very simple process and then, using the improvement cycles, make the circuits more complex.
To start creating a simple billing process:
- Log on to your Iterop online space
- Go to Iterop Design
- Click on create a new model - the models correspond to your drafts.
- You will arrive in the diagram editor where you will draw your first process
- Copy the template below
- Click on the spanner to change the type of task or door
- Add an end event to finish drawing your process
Please note:
- The start corresponds to the action that starts the process: a form, an email, the retrieval of data, etc.
- Human tasks are performed in the application by the teams.
- Service tasks correspond to automations
- Scripting tasks are used to perform complex calculations
- Parallel gates mean that the tasks can take place at the same time and that the process will not be completed until both have been carried out.
In this invoicing circuit, there is a validation loop in case the accounts department needs more information about the invoice. Then, in the second part of the process, the tasks run in parallel with an email notification to the customer and payment of the invoice.
You've finished drawing up the process. Now let's move on to configuring the automations.
Stage 3: Configuring the process
Today, companies often stop at the drawing stage without thinking that they could bring all these inert diagrams to life.
In Iterop, once your diagram has been validated, you are redirected to the configuration interface:
All the configuration is done in the right-hand panel.
You will start by configuring the start-up form that will be displayed to users who launch the process. This is what it will look like:
1: Click on "Trigger" then configure the form
Follow the steps step by step:
| Field name | Type of field | Mandatory | Display condition |
| Invoice number | Auto-incremental Used to identify the process | Yes | |
| Supplier email address | Text Check advanced options > Email | Yes | |
| Invoice amount | Yes | ||
| Line manager If the invoice amount is greater than €10,000, the user must select a line manager for approval. | List of values | Yes Check "Display advanced options" > Display condition > edit > select in the "Invoice amount" variables with operator =, Variable 10 000 (value) | |
| Invoice | File | Yes |
2: Configure the "Validate invoice" task
As part of the validation process, this task can be sent to the line manager or the accounts department.
For the purposes of this tutorial, we are going to assign the task to ourselves as the process initiator. It is also possible to integrate external actors into processes, as we will see later in the tutorial.
| Assignments |
| Dynamic assignment > Task actor > Process launcher |
| Normally, you would put the department responsible for validation here. |
| Email notification | Tick this box if you want the validator to be notified by email. | |
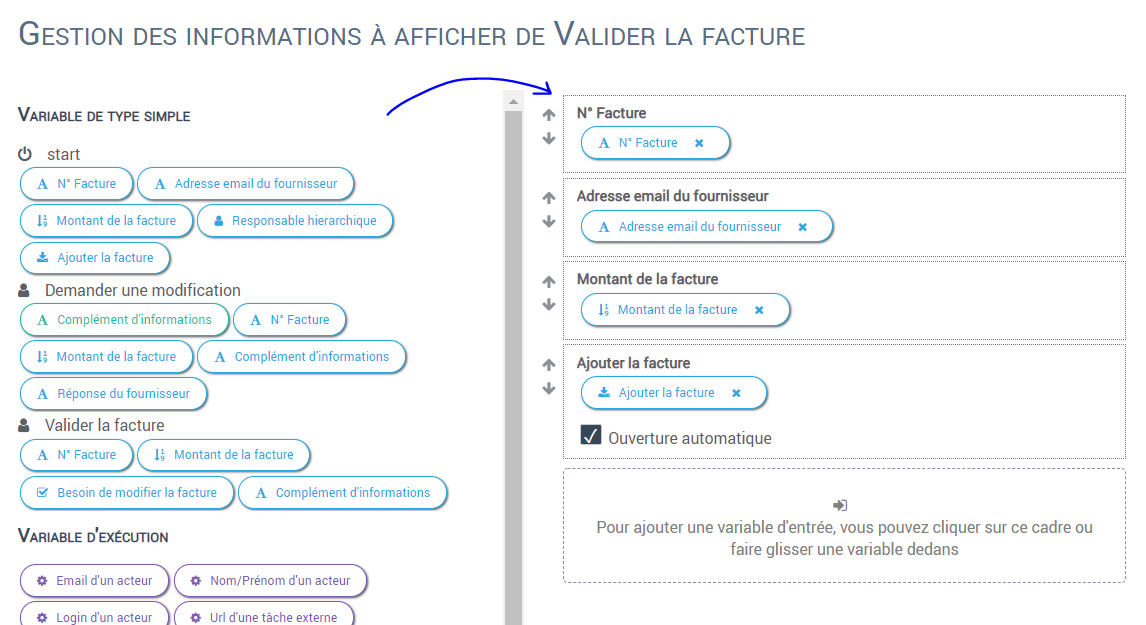
| Information to display | On the left, select the data you wish to retrieve from the user and drag it onto each line on the right.
| |
| Form Set the parameters of the form that the user will have to complete | Field name | Data type |
| Auto-incremental identifier > to be renamed Invoice no. | This data will be displayed to identify the process instance | |
| Invoice amount | Decimal number Tick Mandatory | |
| Need to modify the invoice? | Boolean Tick to display advanced options Yes/No | |
| Additional information | Text block Show advanced options Display condition > Edit
If the need to invoice box is ticked, the additional information block will be displayed dynamically. | |
| You can change the final button on the form | ||

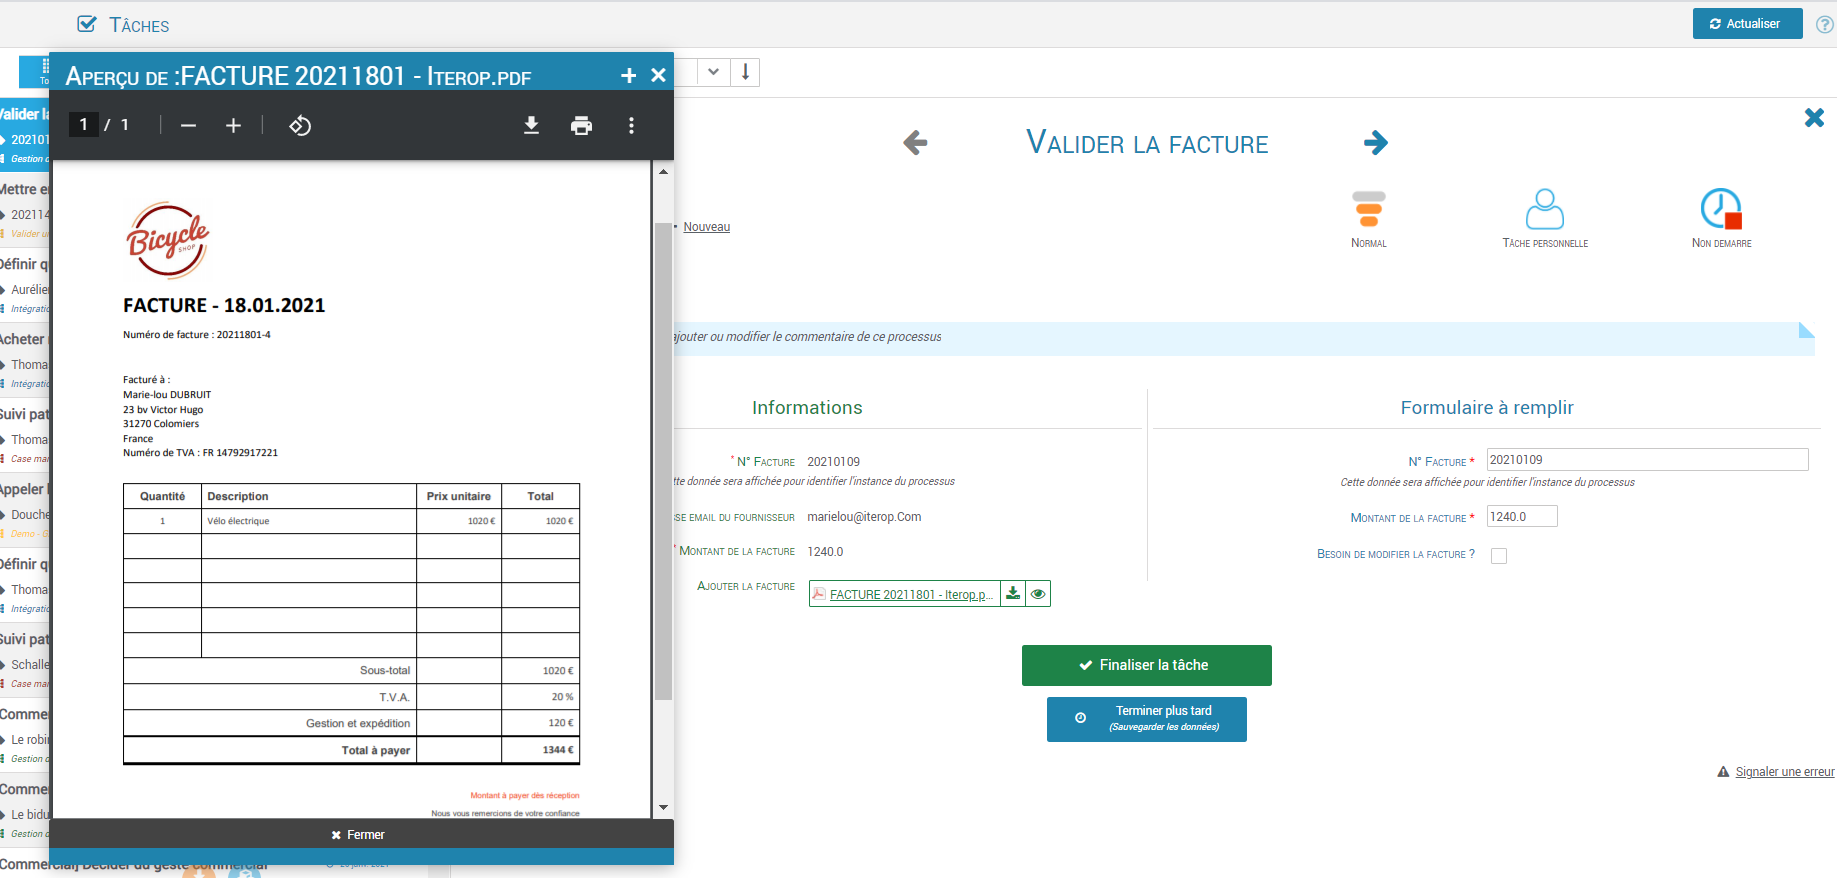
On the User side, this is what will be displayed to the user:
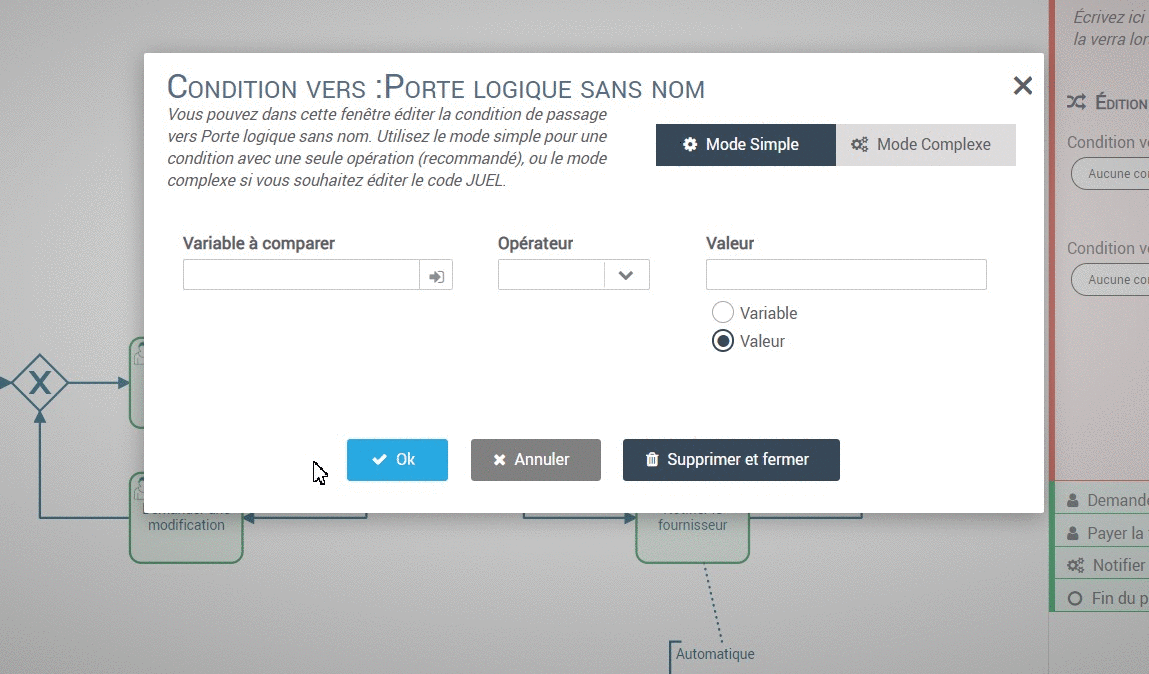
3: Configure the logic gates or "branches
For each branch, we're going to configure the path that the invoice should take according to the information entered by the user.
Condition towards the next task :
If the person in charge of the invoice doesn't need any additional information (need information = not ticked), then the process will continue.
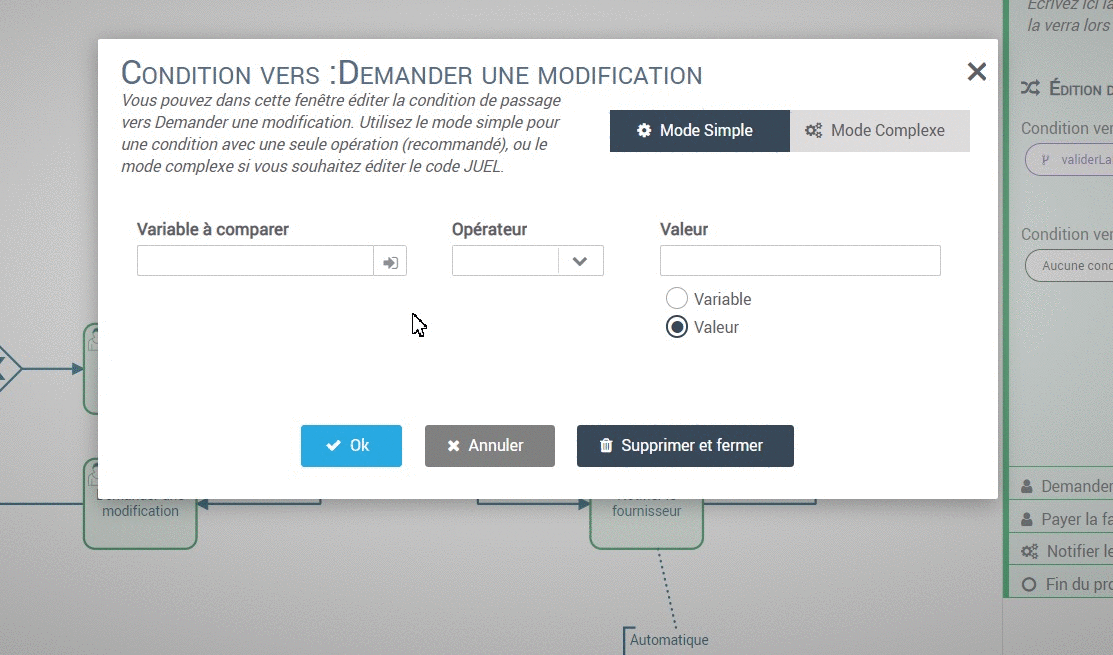
Condition towards the modification task :
If the person in charge of the invoice needs additional information (needs information = ticked), then the process loops back to the modification task and returns to the original requester via an email or an external task.
4: Configure the modification request
We are now going to configure the modification task. In this case, the task is to query an actor external to the organisation. We are going to assign the task by ticking Assignments > Assign to an external party.
Complete the elements as follows:
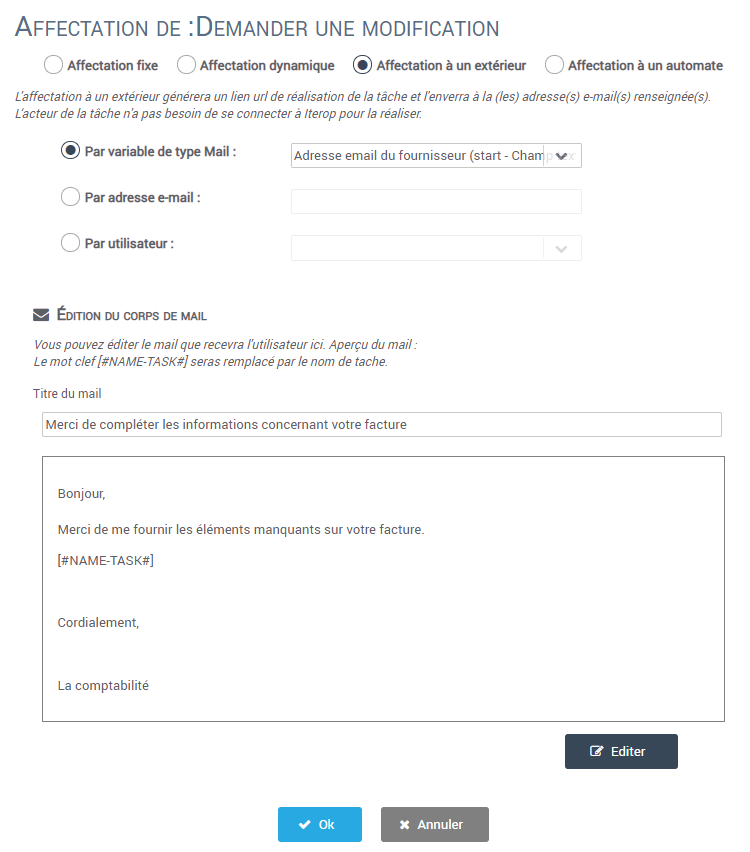
An email with the link to the modification task will automatically be sent to the email address provided by the supplier at the start of the process.
Here's an overview of what the supplier will receive:
Then set the parameters for the data that will be sent to the supplier in the task :
| Email notification | No | |
| Information to be displayed | On the left, select the data you wish to retrieve from the user and drag it onto each line on the right.
| |
| Form Set the parameters for the form that the user will have to complete | Field name | Data type |
| Auto-incremental identifier > to be renamed Invoice no. | This data will be displayed to identify the process instance | |
| Invoice amount | Decimal number Tick Mandatory | |
| Need to modify the invoice? | Boolean Tick Show advanced options Yes/No | |
| Additional information | Text block Show advanced options Display condition > Edit
If the need to invoice box is ticked, then the additional information block will be displayed dynamically. | |
| End of task button Send response | ||
5: Set up the payment task
Here you need to list all the relevant information so that the service can make the payment. It is possible to connect Iterop to accounting tools such as Sage to simplify the updating of transfers.
Assignment to the process launcher for the purposes of the tutorial.
Set up the task as follows:
| Email notification | No | |
| Information to be displayed | On the left, select the data you wish to retrieve from the user and drag it onto each line on the right.
| |
| Form Set the parameters for the form that the user will have to complete | Field name | Data type |
| Has payment been made? | Boolean Tick Mandatory Tick the advanced options : Yes/No | |
| You can change the final button on the form | ||

6: Set the parameters for sending the automatic email
Here we are going to set up the sending of an automatic task that will inform the supplier that their invoice has been paid.
- Click on "Choose service".
- Select the Mail service and click on the "Mail" button
Click on select data and fill in as follows:
Configure the right-hand side, once you have dragged and dropped the variables.
- Click on Configure at the bottom of the label
- Select JUEL
- Write your text and click on the variable to integrate it into your block
N°7: Deploy the process by clicking on the green Deploy button
Your process is deployed!
Take it a step further:
To give you an idea, here's a slightly more complex invoicing process.
- Here, we use an OCR tool to retrieve the paper scan and then a scripting task to make the data usable by the Iterop application.
- The invoice then passes into the hands of the validator, who is given an automatic reminder task.
- We have then integrated a validation circuit depending on the amount of the invoice. If the invoice is rejected, a notification sub-process will inform the supplier of the problem.
- Finally, synchronisation with the CRM has been integrated to avoid double entry.
Step 4: Simplify your employees' day-to-day work
Once your invoicing process has been deployed, you have access to the different levels of rights:
This functionality allows you to refine the levels of supervision and know who has access to launch or monitor processes.
You can also monitor the status of your process in real time, and go even further by designing dashboards entirely dedicated to invoice management (late, processed, pending, etc.):
Depending on the complexity of the workflow and the connections to be made, deployment can be completed in a few hours or a few days. The Iterop solution is the most efficient on the market in terms of time-to-production.
Sponsored article. Expert contributors are authors who are independent of the Appvizer editorial team. Their comments and positions are their own.
Article translated from French